Question 3: What have you learned from your audience feedback? In class, we shared our trailers, posters and websites with our classmates/target audience and asked for good and bad points of the products. This feedback helped us with creating our trailers as it allowed us to understand our target audience a lot better, and to make sure our products reflected that. Below i created a collage to show the good/bad comments i received from my classmates/target audience to help me with my website design. After these comments i was then able to change specific elements of my website to help it connect with the target audience better.

I then did the same for my Poster.

I also posted my poster on facebook - a social networking site, and asked my friends on facebook to give me feedback of what worked and what didn't on my poster. I recieved good and bad points, which helped me with my poster, as there were a few parts of it i was then able to change.

Finally, i asked for feedback on my trailer at 2 stages: One where we were half way through creating our trailer and the next when we had nearly finished the trailer. Our classmates viewed the first stage of the trailer and this is the feedback we got:
Good:
- "The ending of the trailer was really effective with the pulsating hand, as it helped tell the audience the genre, and looked very gorey and real!"
- "The scene where the girl is walking through the corridor helps tell the story well, and also helps reach out to the target audience. The music goes really well with this scene as the change in pitch and sound effects reflects the mood of the scene/story and again helps tell the story to the audience well"
- "The door slamming effect at the end of the trailer fits really well with the imagery, however it could be scarier!"t
- "I like the scene at the begining of the film where the girls are getting ready in one of their rooms. This shot is effective as it sets the overall mood of the film and gives it a modern effect as you don't necesaary see this in all horror films"
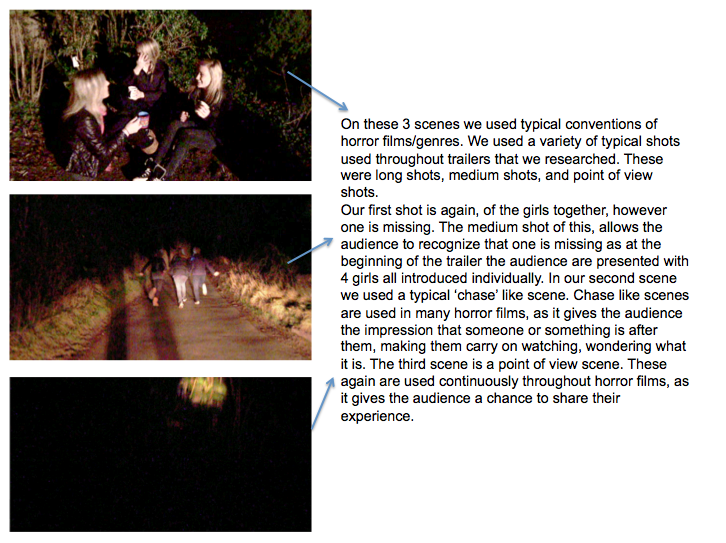
- "The shot where the girls are running up the lane with the tourch, reflects the horror genre well, especially when it feels as if someone is walking up behind them, scary!"
Bad:
- "However, the trailer is too short compared to professional trailers"
- "The individual pictures at the beginning of the trailer take to long to upload, this needs to be much faster, or you could even use a collage/montage instead which would look more effective"
- "One suggestion on the scene in the corridor and the close up of the poster, would be to add a voiceover of a missing news report. This would give the audience an idea of what's happening, as well as adding to the 'mystery' that lies within in film/trailer
- "Include voice-overs when the graphics appear, for example on the 'everything' writing scene"
- "The talking at the beginning scene is not effective enough"
We received good and bad feedback, although the feedback was very constructive, as we were able to talk about and understand peoples views on our trailer whether they were good or bad. The feedback was extremely useful, as our classmates reflected our target audience, so listening to their feedback helped us when further editing the trailer.
After finishing our trailer, we then decided to film our feedback on a camera recorder. We filmed groups of people talking about what they liked and didnt like about our trailer after watching it and their overall opinion on the film - including whether or not they'd like to watch it etc. We filmed one of our groups in our class as they were representative for our target audience.
I then recorded 4 individuals at my other school - this worked more effectively as they had never seen the trailer before - therefore they could give me their honest opinion on what they thought about the effectiveness etc of the trailer
I then uploaded and merged the videos together onto Youtube.
Follow the link below if trouble with media player:
http://www.youtube.com/watch?feature=player_embedded&v=9OmW2C-GKN4
Finally, we uploaded our trailer onto Youtube - a video sharing website. We then posted this on Facebook to our targeted audience, and asked for feedback on the trailer (e.g what they thought of it). Here are some of the comments we received:
- "Ewww the bit at the end with the hand is horrible! didn't expect that"
- "AH i want to see it!! make it a film :)"
- "Oooo the hand bit creeped me out!"
- "So good, well done girls :)"
- "the music is so good! i want to watch the whole film now haha"
Below is an example of the 'likes' and comments, an hour after we uploaded the video to Facebook.
Overall I learned a great deal by feedback. I mainly learnt what could be improved in order for my trailer to fit well and comply within my target audience. I also learnt what was good about our trailer originally which showed i had applied my skills well within the task.
I was extremely happy with my final products as i felt i had listened to feedback and used it constructively to improve my products in order to gain the interest of my target audience.
Although if i were to do the trailer again, i would change only a few aspects of the trailer. If i had more time for the task, i would make my trailer a lot longer, as i felt ours was a little too short. I would also change some of the camera angles and included more of a variety of 'unusual' shots which are predominately used throughout horror/scary films.
Question 4: How did you use new media technologies in the construction, research, planning and evaluation stages? New media technologies: New media technology is any type of application meant to transfer information via digital techniques, computerized systems or data networks. The most prevalent examples of new media technologies include Internet-based concepts like websites or digital mediums such as CD-ROMs and DVDs. When creating my trailer I used avariety of new media technology. Without the technology I would not have been able to research, design and create my trailer. On my trailer I used:
1) A Laptop
2) Movie (Computer Programme)
3) Photoshop (Computer Programme)
4) Internet - (Youtube, Facebook, IMDB etc)
5) ITunes
6) Camera Recorder
7) Camera Tripod
8) Microphone
 1)
1) The laptop I used was one of the main pieces of new media technology along with the camera recorder. The laptop allowed me to access specific vital programmes such as Imovie and Photoshop as spoken about below. The computer allowed me to store my clips of my trailer from my camera via USB port. I was able to organise and store my work ready to put it together with my group.
2) Imovie is a programme that came withmy computer software. Imovie allows you to create trailer/films by adding in your own clips from your camera, and then allows you to edit it to specifically how you want it. Imovie has a series of functions. Imovie helped me a lot with my trailer, as I was able to put it all together using this programme.
Imovie allowed me to: add in clips which i downloaded off my camera, edit the lighting, exposure, sharpness, contrast, and saturation of the moving images, add in music and change the pitch, volume, reduce background noise, add special effects to the moving images, such as changeovers (fades), zooming in of clips, special effect sounds, borders, text and many more. If I were without this programme I would find it extremely difficult to put together my trailer as it had every function that was needed to make a professional trailer.
3) Photoshop is a programme specific for editing photographs and images. I used Photoshop to create my Poster, Website and aspects of myTrailer such as the graphics. For the research of my project, I used Photoshop to edit previous film horror images and added me own text to the previous images to give me an idea of what I could create for my poster. This helped along with my planning as I already had a clear idea of specific features of a horror film poster/website/trailer.
Alternatively if this technology was not available to me, I would have done my poster/website/graphics by hand, using sketches to help me plan and colouring to help me develop my ideas.
4) In order for a starting point of my trailer, I had to use the Internet to research the typical horror genres, which were already out. I used IMBD to research and specific trailers which fitted in the horror genre. This website helped me with my creativity and gave me a range of ideas for my trailer. I used Youtube to research music typical of a horror trailer. I was then able to download/convert music from this site and apply it to my trailer via iTunes. I used the Facebook – a social networking site to get feedback on my trailer. I uploaded my trailer on my Facebook page and asked my friends to comment on what they thought was good/bad about it. Doing this helped me get an idea of what the audience thought, as well as giving me good and bad points which I was then able to change.
5) iTunes is a music library. I used this for downloading music for my trailer, as well as special effect sounds. If I were without this programme I would find it hard to include music/sounds into my trailer, however I could alternatively use a microphone to record any voices or sounds in particular that I needed.
6) The camera recorder was the main piece of new media technology used in my trailer. The camera recorder enabled me to film the scenes to go in the trailer, and allowed me to zoom in and out in particular scenes to get different camera shots/angles.
7) The camera tripod was used for scene 2 where the girls are sitting in the bedroom. The camera tripod held my camera in a specific position – and gave me a camera angle I wanted, so no one needed to hold it as we all needed to be in this scene.
8) I used the microphone on my laptop to record the voice over for my trailer. This was very helpful as I was able to edit the pitch/volume/background noise of the recorded voices. Without the microphone I would have to use acoustic music/voices to go along with my trailer.


 I then did the same for my Poster.


 1) The laptop I used was one of the main pieces of new media technology along with the camera recorder. The laptop allowed me to access specific vital programmes such as Imovie and Photoshop as spoken about below. The computer allowed me to store my clips of my trailer from my camera via USB port. I was able to organise and store my work ready to put it together with my group.


